[Skip Navigation](https://www.att.com#mega-z2_jump_link)
[Personal](https://www.att.com/) [Business](https://www.business.att.com)
[Find a store](https://www.att.com/stores/) [Ver en español](javascript:void%280%29)
[](https://www.att.com)
- Shop
Shop
- [Plans & services](#)
- [Devices & accessories](#)
Quick actions [Upgrade](https://www.att.com/upgrade/) [Add a line](https://www.att.com/plans/add-a-line/) [Bring your own phone](https://www.att.com/wireless/byod/) [Switch & save](https://www.att.com/wireless/switch-and-save/)
Bundles
- [Explore bundles](https://www.att.com/bundles/)
- [AT&T OneConnect](https://www.att.com/oneconnect/)
- [Internet + wireless](https://www.att.com/bundles/internet-wireless/)
- [Internet + home phone](https://www.att.com/home-phone)
- [Customers 55+](https://www.att.com/bundles/55-plus-internet-wireless)
Wireless
- [Explore wireless](https://www.att.com/wireless/)
- [Phone plans](https://www.att.com/plans/wireless/)
- [Network coverage](https://www.att.com/maps/wireless-coverage.html)
- [Explore prepaid](https://www.att.com/prepaid/)
- [International add-ons](https://www.att.com/international/)
- [Connected car](https://www.att.com/plans/connected-car/)
Home internet
- [Explore home internet](https://www.att.com/internet/)
- [Check availability](https://www.att.com/buy/internet/plans)
- [AT&T Fiber](https://www.att.com/internet/fiber/)
- [AT&T Internet Air](https://www.att.com/internet/internet-air/)
- [Home phone](https://www.att.com/home-phone/services/)
[__Congrats to all the 2026 graduates!__
\
Shop Gift Guide](https://www.att.com/deals/graduation/)
New arrivals [Samsung Galaxy S26 Ultra](https://www.att.com/buy/phones/samsung-galaxy-s26-ultra.html) [iPhone 17 Pro](https://www.att.com/buy/phones/apple-iphone-17-pro.html) [AirPods Pro 3](https://www.att.com/buy/accessories/Headphones/apple-airpods-pro-3.html) [Google Pixel 10 Pro](https://www.att.com/buy/phones/google-pixel-10-pro.html)
Devices
- [Phones](https://www.att.com/buy/phones/)
- [Prepaid phones](https://www.att.com/buy/prepaid-phones/)
- [Tablets](https://www.att.com/buy/tablets/)
- [Smartwatches](https://www.att.com/buy/wearables/)
Accessories
- [Shop all accessories](https://www.att.com/accessories/)
- [Cases](https://www.att.com/buy/accessories/browse/cases/)
- [Chargers](https://www.att.com/buy/accessories/browse/chargers/)
- [Screen protectors](https://www.att.com/buy/accessories/browse/screen-protectors/)
- [Headphones](https://www.att.com/buy/accessories/browse/headphones/)
Brands
- [Apple](https://www.att.com/buy/phones/browse/apple/)
- [Samsung](https://www.att.com/buy/phones/browse/samsung/)
- [Motorola](https://www.att.com/buy/phones/browse/motorola/)
- [Google](https://www.att.com/buy/phones/browse/google/)
- [Meta](https://www.att.com/buy/accessories/browse/all/meta/)
[__Get iPhone 17 Pro for $0 with trade-in. Any condition.__
\
Shop now](https://www.att.com/buy/phones/apple-iphone-17-pro.html)
- Deals
Deals
- [New & featured](#)
- [Customer discounts](#)
Featured [Shop all deals](https://www.att.com/deals/) [Wireless deals](https://www.att.com/deals/cell-phone-deals/) [Internet deals](https://www.att.com/deals/internet/) [Trade-in offers](https://www.att.com/buy/phones/browse/tradeinoffer/)
Trending deals
- [Samsung Galaxy](https://www.att.com/buy/phones/browse/samsung_hasdeals_value_nontradeinoffer_tradeinoffer/)
- [Apple iPhone](https://www.att.com/buy/phones/browse/apple_hasdeals_value_nontradeinoffer_tradeinoffer/)
- [Under $50](https://www.att.com/buy/accessories/browse/all/price-range-25-50_price-range-5-25_5-and-under/)
- [Graduation Gift Guide](https://www.att.com/deals/graduation/)
Device & accessory deals
- [Phones](https://www.att.com/buy/phones/browse/hasdeals_value_nontradeinoffer_tradeinoffer/)
- [Prepaid phones](https://www.att.com/buy/prepaid-phones/browse/hasdeals/)
- [Tablets](https://www.att.com/buy/tablets/browse/hasdeals_nontradeinoffer/)
- [Smartwatches](https://www.att.com/buy/wearables/browse/hasdeals_nontradeinoffer/)
- [Accessory deals](https://www.att.com/buy/accessories/browse/all/deals/)
Subscriptions
- [AT&T OneConnect](https://www.att.com/oneconnect/)
[__Switch to AT&T and learn how to get up to $800/line to break your contract__
\
Shop now](https://www.att.com/buy/phones/)
Discounts by occupation
- [Business employees](https://www.att.com/verification/signaturehub/#employment)
- [Military & veterans](https://www.att.com/offers/discount-program/military-discount/)
- [Teachers](https://www.att.com/offers/discount-program/teacher/)
- [Nurses & physicians](https://www.att.com/verification/signaturehub/#medical)
- [Active responders](https://www.att.com/firstnetandfamily/)
Discounts by affiliation
- [Customers 55+](https://www.att.com/verification/signaturehub/#age)
- [Retired responders](https://www.att.com/offers/discount-program/retired-responders/)
- [Union workers](https://www.att.com/offers/discount-program/union-discount/)
- [Students](https://www.att.com/verification/signaturehub/#student)
Partner savings
- [Credit card discount](https://www.att.com/deals/att-points-plus-citi/)
- [&More Benefits](https://andmorebenefits.att.com/root-discovery)
[__Military members: save up to $1,150/line__
\
Learn more](https://www.att.com/offers/discount-program/military-discount/?source=EEC599290159)
- AT&T Difference
AT&T Difference
- [Our competitive edge](#)
Why choose us
- [AT&T Guarantee](https://www.att.com/why-att/guarantee)
- [Why AT&T](https://www.att.com/why-att/)
- [AT&T vs. T-Mobile & Verizon](https://www.att.com/wireless/switch-and-save/#compare-us)
- [AT&T Fiber vs. Spectrum & Xfinity](https://www.att.com/internet/fiber/#compare-us)
- [Try AT&T for free](https://www.att.com/wireless/free-trial)
- [Switch & save](https://www.att.com/wireless/switch-and-save/)
Exceptional coverage
- [5G coverage map](https://www.att.com/maps/wireless-coverage.html)
- [Fiber coverage map](https://www.att.com/internet/fiber/coverage-map/)
[__America’s best guarantee__
\
Learn more](https://www.att.com/why-att/guarantee/)
- Support
Support
- [Bill & account](#)
- [Wireless](#)
- [Internet](#)
Quick actions [View all support](https://www.att.com/support/) [Go to my account](https://www.att.com/acctmgmt/overview) [Payment center](https://www.att.com/acctmgmt/mypaymentcenter) [Billing center](https://www.att.com/acctmgmt/billing/mybillingcenter)
Bill & payments
- [Understand your bill](https://www.att.com/support/my-account/understand-your-bill/)
- [Find out why your bill changed](https://www.att.com/support/article/my-account/KM1051879)
- [Set up and manage AutoPay](https://www.att.com/acctmgmt/mypaymentcenter?intent=MANAGEAUTOPAY)
- [View device installments](https://www.att.com/acctmgmt/payment/installmentplandetails)
- [Pay without signing in](https://www.att.com/acctmgmt/fastpmt/fastpay)
Account
- [Change or reset password](https://www.att.com/support/article/my-account/KM1008941)
- [Add or remove accounts](https://www.att.com/support/article/my-account/KM1008925)
- [Move internet service](https://www.att.com/help/moving/)
- [View my orders and claims](https://www.att.com/orders/history)
- [More account help](https://www.att.com/support/my-account/)
[__America’s best guarantee__
\
Learn more](https://www.att.com/why-att/guarantee/)
Quick actions [Manage my wireless service](https://www.att.com/acctmgmt/mywireless) [Track my order](https://www.att.com/orders/history) [Add AT&T International Day Pass](https://www.att.com/acctmgmt/signin?intent=DEEPLINK&soc=IRRLHDF&level=CAT&source=ILC242589969&wtExtndSource=Megamenu)
My device
- [Check my usage](https://www.att.com/acctmgmt/usage/mysummary)
- [Manage add-ons](https://www.att.com/acctmgmt/wireless/manage-addon)
- [Change my plan](https://www.att.com/acctmgmt/mywireless/manageplan/)
- [Add a line](https://www.att.com/buy/postpaid/?wlsfi=AL)
- [Check upgrade eligibility](https://www.att.com/buy/postpaid/?wlsfi=up)
- [Activate a wireless device](https://www.att.com/support/how-to/wireless/get-started)
Device options
- [Manage eSIM](https://www.att.com/acctmgmt/wireless/manage-esim)
- [Suspend wireless service](https://www.att.com/acctmgmt/wireless/suspend)
- [Transfer a number to AT&T](https://www.att.com/acctmgmt/wireless/transfer-number)
- [Change phone number](https://www.att.com/acctmgmt/wireless/change-number)
- [Unlock a device](https://www.att.com/acctmgmt/wireless/device-unlock)
Wireless help
- [Check for outages](https://www.att.com/outages/)
- [Use device hotspot](https://www.att.com/support/article/wireless/KM1009376)
- [Device protection & warranty](https://www.att.com/support/device-protection-warranty/)
- [More wireless help](https://www.att.com/support/wireless/)
[__America’s best guarantee__
\
Learn more](https://www.att.com/why-att/guarantee/)
Quick actions [Manage my internet service](https://www.att.com/acctmgmt/myinternet) [Track my order](https://www.att.com/orders/history) [Get help moving](https://www.att.com/help/moving/)
Equipment
- [Restart a gateway](https://www.att.com/support/article/u-verse-high-speed-internet/KM1010361/)
- [Find Wi-Fi info](https://www.att.com/support/article/internet/KM1203150/)
- [Run internet speed test](https://www.att.com/support/speedtest/)
- [Set up Internet Air](https://www.att.com/support/article/internet/KM1489093)
Troubleshooting
- [Check for outages](https://www.att.com/outages/)
- [Manage appointments](https://www.att.com/orders/history)
- [Optimize connection](https://www.att.com/support/how-to/optimize-your-connection)
- [More internet help](https://www.att.com/support/internet/)
[__America’s best guarantee__
\
Learn more](https://www.att.com/why-att/guarantee/)
Search site
Search or chat
Your cart is empty
Let's get shopping!
[Explore bundles](https://www.att.com/bundles) [Shop phones](https://www.att.com/buy/phones)
[Sign in](https://www.att.com/acctmgmt/overview) [Create an account](https://www.att.com/acctmgmt/registration/selectServices) [Forgot user ID?](https://identity.att.com/identity-ui/fid/lander?trid=9806a0fd32a18ad2ce22ba62b72f0d6f8631e5e1&Return_URL=https%3A%2F%2Foidc.idp.clogin.att.com%2Fmga%2Fsps%2Foauth%2Foauth20%2Fauthorize%3Fresponse_type%3Did_token%26client_id%3Dm14186%26redirect_uri%3Dhttps%253A%252F%252Fwww.att.com%252Fmsapi%252Flogin%252Funauth%252Fservice%252Fv1%252Fhaloc%252Foidc%252Fredirect%26state%3Dfrom%253Dnx%26scope%3Dopenid%26response_mode%3Dform_post%26nonce%3DH0ihL2qQ&Cancel_URL=https%3A%2F%2Foidc.idp.clogin.att.com%2Fmga%2Fsps%2Foauth%2Foauth20%2Fauthorize%3Fresponse_type%3Did_token%26client_id%3Dm14186%26redirect_uri%3Dhttps%253A%252F%252Fwww.att.com%252Fmsapi%252Flogin%252Funauth%252Fservice%252Fv1%252Fhaloc%252Foidc%252Fredirect%26state%3Dfrom%253Dnx%26scope%3Dopenid%26response_mode%3Dform_post%26nonce%3DH0ihL2qQ&lang=en-us)
* * *
[Make a payment](https://www.att.com/acctmgmt/payment/makepayment) [Pay without signing in](https://www.att.com/acctmgmt/fastpmt/fastpay) [Go to my prepaid account](https://www.paygonline.com/websc/loginPage.html)
Welcome back!
[Switch user](https://www.att.com/acctmgmt/logout?kmsi=y&target_url=https%3A%2F%2Fwww.att.com%2Facctmgmt%2Flogin)
[Sign out](https://www.att.com/acctmgmt/logout?kmsi=n)
Quick actions [&More Benefits](https://andmorebenefits.att.com/) [My favorites](https://www.att.com/myfavorites/) [Privacy choices](https://www.att.com/acctmgmt/myprofile/overview?flow=privacy-choices)
Account overview
- [Check my notifications](#)
- [Go to my account](https://www.att.com/acctmgmt/overview)
- [Update my profile](https://www.att.com/acctmgmt/myprofile/overview)
- [View my orders & claims](https://www.att.com/orders/history)
- [Go to my prepaid account](https://www.paygonline.com/websc/loginPage.html)
Bill & payments
- [Make a payment](https://www.att.com/acctmgmt/payment/makepayment)
- [See my bill](https://www.att.com/acctmgmt/billing/mybillingcenter)
Welcome back!
[Sign out](https://www.att.com/acctmgmt/logout?kmsi=n)
[Switch user](https://www.att.com/acctmgmt/logout?kmsi=y&target_url=https%3A%2F%2Fwww.att.com%2Facctmgmt%2Flogin)
## Account overview
- [Check my notifications](#)
- [Go to my account](https://www.att.com/acctmgmt/overview)
- [Update my profile](https://www.att.com/acctmgmt/myprofile/overview)
- [View my orders & claims](https://www.att.com/orders/history)
- [Go to my prepaid account](https://www.paygonline.com/websc/loginPage.html)
## Bill & payments
- [Make a payment](https://www.att.com/acctmgmt/payment/makepayment)
- [See my bill](https://www.att.com/acctmgmt/billing/mybillingcenter)
Quick actions
- [&More Benefits](https://andmorebenefits.att.com/)
- [My favorites](https://www.att.com/myfavorites/)
- [Privacy choices](https://www.att.com/acctmgmt/myprofile/overview?flow=privacy-choices)
Search or chat
[](https://www.att.com)
## Shop
- [Plans & services](#)
- [Devices & accessories](#)
## Deals
- [New & featured](#)
- [Customer discounts](#)
- [View all deals](https://www.att.com/deals/)
## AT&T Difference
- [Our competitive edge](#)
## Support
- [Bill & account](#)
- [Wireless](#)
- [Internet](#)
- [View all support](https://www.att.com/support/)
- [AT&T Business](https://www.business.att.com/)
- [Find a store](https://www.att.com/stores/)
- [Ver en español](javascript:void%280%29)
Back
Shop
## Plans & services
### Bundles
- [Explore bundles](https://www.att.com/bundles/)
- [AT&T OneConnect](https://www.att.com/oneconnect/)
- [Internet + wireless](https://www.att.com/bundles/internet-wireless/)
- [Internet + home phone](https://www.att.com/home-phone)
- [Customers 55+](https://www.att.com/bundles/55-plus-internet-wireless)
### Wireless
- [Explore wireless](https://www.att.com/wireless/)
- [Phone plans](https://www.att.com/plans/wireless/)
- [Network coverage](https://www.att.com/maps/wireless-coverage.html)
- [Explore prepaid](https://www.att.com/prepaid/)
- [International add-ons](https://www.att.com/international/)
- [Connected car](https://www.att.com/plans/connected-car/)
### Home internet
- [Explore home internet](https://www.att.com/internet/)
- [Check availability](https://www.att.com/buy/internet/plans)
- [AT&T Fiber](https://www.att.com/internet/fiber/)
- [AT&T Internet Air](https://www.att.com/internet/internet-air/)
- [Home phone](https://www.att.com/home-phone/services/)
### Quick actions
- [Upgrade](https://www.att.com/upgrade/)
- [Add a line](https://www.att.com/plans/add-a-line/)
- [Bring your own phone](https://www.att.com/wireless/byod/)
- [Switch & save](https://www.att.com/wireless/switch-and-save/)
Start of main content
1. [Home](https://www.att.com/)
2. [Support](https://www.att.com/support/)
3. [AT&T Wireless](https://www.att.com/support/wireless/)
# Mobile Hotspot Wi-Fi Not Found
This article describes what to do if the network is not found.
* * *
## Mobile Hotspot Wi-Fi Not Found
Learn how to Check Network Status, Check Blocked Devices, and Change Wi-Fi Band.
Mobile Hotspot Wi-Fi Not Found
1:08
* * *
INSTRUCTIONS & INFO
In this tutorial, you will learn how to:
• Wake the device
• Change Wi-Fi Bands
• Disable or re-enable Wi-Fi
• Configure access controls from the web
• View Network status on the device
## Wake the device
If the device is unplugged and the Wi-Fi network is inactive for five minutes the Wi-Fi network will go on standby. If the Wi-Fi network cannot be found on a Wi-Fi enabled device, the NETGEAR Nighthawk™ M7 Pro might be asleep. To wake up the device, press the __Power button__.
*Note: To change the Standby time, from the home screen select __Wi-Fi__ > __Options__ > __Wi-Fi Standby__ > desired __option.__*

* * *
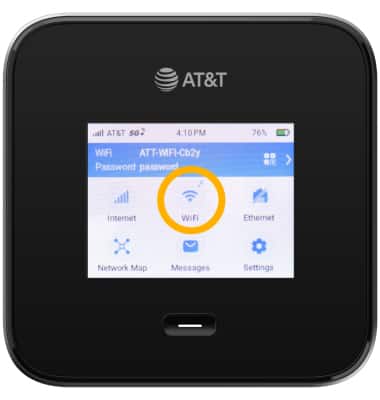
## Change Wi-Fi Bands
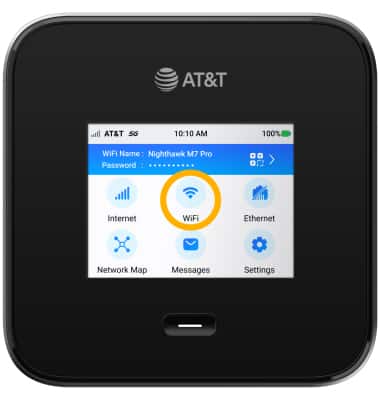
1\. From the home screen, select __Wi-Fi__.
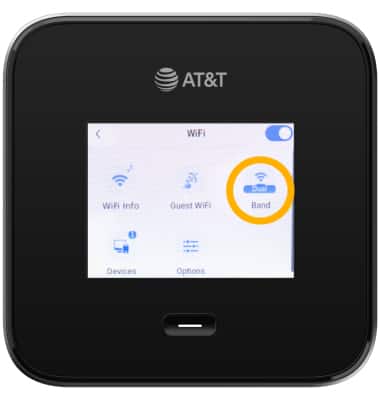
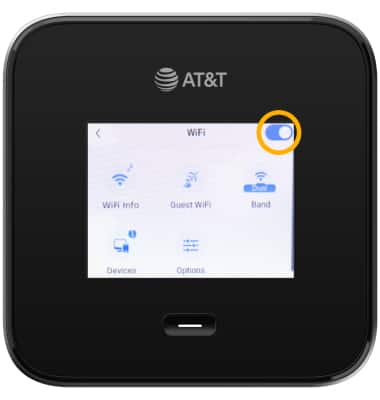
2\. Select __Band__.
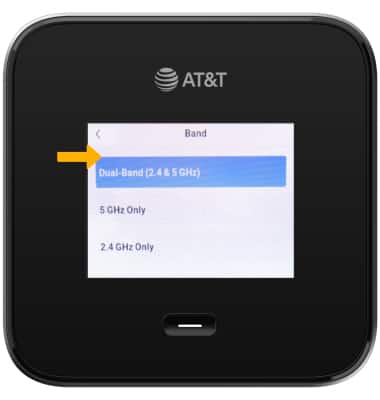
3\. Select the desired __Wi-Fi__ __band__. In most situations, Dual-band is more likely to work across a variety of devices.
* * *
## Disable or re-enable Wi-Fi
1\. From the home screen, select __Wi-Fi__.
2\. Select the __Wi-Fi Signal switch__.
* * *
## Configure access controls from the web
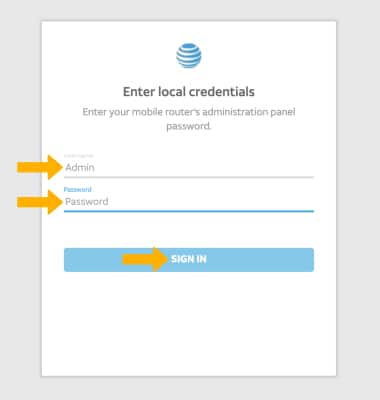
1\. From your device's web browser, go to [http://attwifimanager](http://attwifimanager) or type 192.168.1.1 into the search bar. Enter your __Username__ and __Password__, then click __SIGN__ __IN__.
*Note: Ensure that your device is connected to the Netgear Nighthawk's Wi-Fi network. For more information, please see the [Connect Devices to Wi-Fi](https://www.att.com/device-support/index/9007192) or [Connect PC or Mac to Wi-Fi](https://www.att.com/device-support/index/9007133) tutorials.*
[](https://www.att.com/device-support/index/9007133)
2\. Click __SETTINGS__ at the top of the screen.
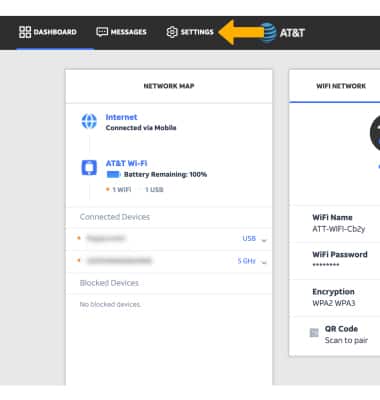
3\. Click __Security__, then click __Access__ __Controls__. Ensure that the __Enable checkbox__ is selected.
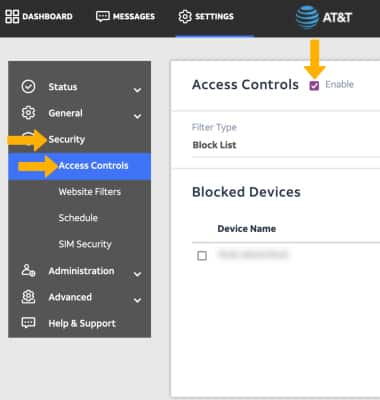
4\. Ensure that the device that is unable to connect to the NETGEAR Nighthawk™ M7 Pro's network is not on the block list. If the device is on the block list, click the __checkbox__ next to the desired device, then click __Delete__.
*Note: By default, Access Controls will be set to a Block list. If you would like to switch to an Allow list, select the __Filter type drop-down__, then select __Allow list__. If you are using an Allow list, ensure the device you want to use is on the Allow list.*

* * *
## View Network status on the device
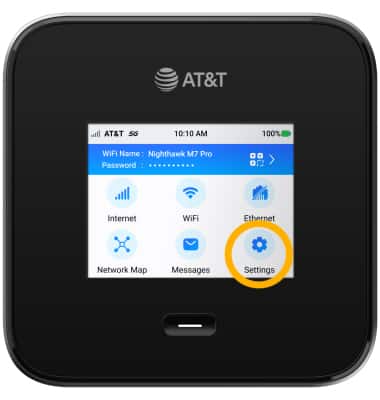
1\. From the home screen, select __Settings__.
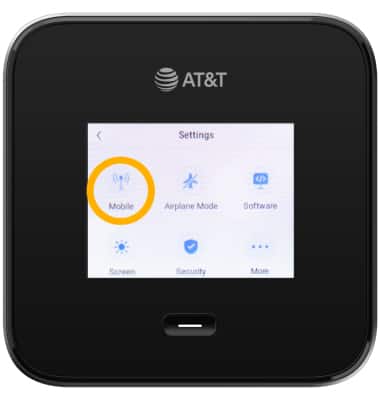
2\. Select __Mobile__.
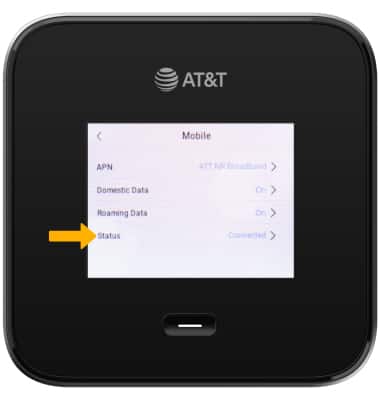
3\. Select __Status__. The device's connection status will be displayed.
Last updated: August 23, 2024
* * *
## Browse topics
Activation, setup, transfer & unlock
Apps, features & voicemail
International
Network & hotspots
Plans & device protection
Upgrades, orders & installment plans
Ready, set, go! Activate your device, set it up on our network, and transfer your contacts and info.
Activate
Setup
Transfer
Unlock
### Was this guide helpful?
[](https://x.com/att "Follow us on X (Opens in new window)")[](https://www.facebook.com/ATT "Follow us on Facebook (Opens in new window)")[](https://www.instagram.com/att/ "Follow us on Instagram (Opens in new window)")[](https://www.linkedin.com/company/att/ "Follow us on Linkedin (Opens in new window)")
Shop
- [Cell phones](https://www.att.com/buy/phones/)
- [Fiber internet](https://www.att.com/internet/fiber/)
- [Home internet](https://www.att.com/internet/)
- [Tablets](https://www.att.com/buy/tablets/)
- [Smartwatches](https://www.att.com/buy/wearables/)
- [Wireless accessories](https://www.att.com/accessories/)
- [Prepaid phones](https://www.att.com/prepaid/)
Trending
- [iPhone 17 Pro Max](https://www.att.com/buy/phones/apple-iphone-17-pro-max.html)
- [iPhone 17 Pro](https://www.att.com/buy/phones/apple-iphone-17-pro.html)
- [iPhone Air](https://www.att.com/buy/phones/apple-iphone-air.html)
- [iPhone 17](https://www.att.com/buy/phones/apple-iphone-17.html)
- [Samsung Galaxy S26 Ultra](https://www.att.com/buy/phones/samsung-galaxy-s26-ultra.html)
- [Samsung Galaxy Z Fold7](https://www.att.com/buy/phones/samsung-galaxy-z-fold7.html)
- [Samsung Galaxy Z Flip7](https://www.att.com/buy/phones/samsung-galaxy-z-flip7.html)
Top phone & data plans
- [Unlimited phone plans](https://www.att.com/plans/wireless/)
- [International plans](https://www.att.com/international/)
- [Add a line](https://www.att.com/plans/add-a-line/)
- [Upgrade](https://www.att.com/plans/phone-upgrade/)
- [Tablet data plans](https://www.att.com/plans/tablet-ipad-data-plans/)
- [Mobile hotspot plans](https://www.att.com/plans/tethering/)
- [Next Up Anytime](https://www.att.com/plans/next-up-anytime/)
Switch to AT&T
- [Switch to AT&T](https://www.att.com/wireless/switch-and-save/)
- [How to switch phone carriers](https://www.att.com/wireless/how-to-switch-phone-carrier/)
- [Internet speed test](https://www.att.com/support/speedtest/)
- [Bring your own device](https://www.att.com/wireless/byod/)
- [Cell phone trade-in](https://tradein.att.com/)
- [Transfer your internet service](https://www.att.com/moving/)
Featured deals
- [AT&T Deals & Promotions](https://www.att.com/deals/)
- [Cell phone deals](https://www.att.com/deals/cell-phone-deals/)
- [iPhone deals](https://www.att.com/deals/iphone-deals/)
- [Samsung deals](https://www.att.com/buy/phones/browse/samsung_hasdeals/)
- [Phone and internet bundle deals](https://www.att.com/bundles/internet-wireless/)
- [Credit card discount](https://www.att.com/deals/att-points-plus-citi/)
- [Free phone deals for new customers](https://www.att.com/buy/phones/browse/free/)
Shop cell phones by brand
- [New Apple iPhones](https://www.att.com/buy/phones/browse/apple/)
- [New Samsung Galaxy phones](https://www.att.com/buy/phones/browse/samsung/)
- [New Google Pixel phones](https://www.att.com/buy/phones/browse/google/)
- [New Motorola Moto phones](https://www.att.com/buy/phones/browse/motorola/)
- [New Sonim phones](https://www.att.com/buy/phones/browse/sonim/)
Tablets & Watches
- [New Apple iPad](https://www.att.com/buy/tablets/browse/apple/)
- [New Samsung Galaxy Tab](https://www.att.com/buy/tablets/browse/samsung/)
- [New Apple Watch](https://www.att.com/buy/wearables/browse/apple/)
- [New Samsung Galaxy Watch](https://www.att.com/buy/wearables/browse/samsung/)
- [New Google Pixel Watch](https://www.att.com/buy/wearables/browse/google/)
- [New Kids Smart Watch](https://www.att.com/buy/wearables/att-amigo-jr-watch.html)
Accessories by Brand
- [Apple accessories](https://www.att.com/buy/accessories/browse/all/apple/)
- [AT&T accessories](https://www.att.com/buy/accessories/browse/all/att/)
- [Samsung accessories](https://www.att.com/buy/accessories/browse/all/samsung/)
- [Otterbox phone cases](https://www.att.com/buy/accessories/browse/cases/otterbox/)
- [Beats headphones](https://www.att.com/buy/accessories/browse/headphones/beats/)
Resources
- [Bundle internet and wireless](https://www.att.com/bundles/)
- [What is Internet Air?](https://www.att.com/internet/what-is-internet-air/)
- [How to use your phone internationally](https://www.att.com/wireless/how-to-use-your-cell-phone-internationally/)
- [What is fiber internet?](https://www.att.com/internet/what-is-fiber-internet/)
- [What is eSIM?](https://www.att.com/wireless/what-is-esim/)
- [Return or exchange your wireless device](https://www.att.com/wireless/return-policy/)
AT&T
- [Find a store](https://www.att.com/stores/)
- [Newsroom](https://about.att.com/?source=EB00CO0000000000L&wtExtndSource=footer)
- [Investor Relations](https://investors.att.com)
- [Corporate Responsibility](https://sustainability.att.com/)
- [Careers](https://www.att.jobs/)
- [Help & info](https://www.att.com/support/)
- [AT&T Guarantee](https://www.att.com/why-att/guarantee/)
- [Broadband Facts Machine Readable Files](https://www.att.com/broadbandlabels/broadband-facts-machine-readable-plans/)
- [Screen share code](https://www.att.com)
* * *
- [Techbuzz blog](https://www.att.com/blog)
- [Feedback](https://secure.opinionlab.com/ccc01/o.asp?id=fXJtjaWr)
- [FREE AT&T Email with 1TB storage](https://www.att.com/partners/currently/email-sign-up/?source=EnEmail2020000BDL&wtExtndSource=myattglobalfooter)
- [LLMs](https://www.att.com/llms.txt)
* * *
- [Site map](https://www.att.com/sitemap/)
- [Coverage maps](https://www.att.com/maps/wireless-coverage.html)
- [Terms of use](https://www.att.com/legal/terms.attWebsiteTermsOfUse.html)
- [Accessibility](https://about.att.com/sites/accessibility)
- [Broadband details](https://about.att.com/sites/broadband)
- [Legal policy center](https://www.att.com/legal/legal-policy-center.html)
- [Advertising choices](https://about.att.com/privacy/privacy-notice.html#choice)
- [Privacy center](https://about.att.com/privacy.html)
- [Your Privacy Choices](https://about.att.com/privacy/choices-and-controls.html)
- [Health Privacy Notice](https://about.att.com/privacy/StateLawApproach/washington-health-privacy-notice.html)
- [Cyber Security](https://about.att.com/pages/cyberaware)
- [FCC public files](https://publicfiles.fcc.gov/cable-profile/999999-at&t-u-verse)
©
2026 AT&T Intellectual Property. All rights reserved.
We use [cookies](https://about.att.com/privacy/full_privacy_policy/cookies.html) to help enhance your experience on our site and for analytics. We also may use cookies for marketing purposes. You can manage your preferences and opt out of the sharing for targeted advertising and sales of cookie data.
Learn more about our approach to privacy at [att.com/privacy](https://att.com/privacy).
Manage your preferences Opt out Continue without changes