How do I set up AT&T High Speed Internet Service for multiple computers using the Installation Wizard CD?
Learn how to set up AT&T High Speed Internet Service for multiple computers using the Installation Wizard CD.
Set up AT&T High Speed Internet Service for multiple computers using the Installation Wizard CD
Note: Do Not Skip Steps. It is very important to follow these step-by-step instructions in order and examine each picture carefully.
Choice A - PC Port (HomePNA adapter)
Note: The PC Port can only be used with computers running Windows XP, 2000, ME, 98 Second Edition, and Macintosh 8.6 to 9.2.
Choice B - Wireless PC Card (PCMCIA Card)
Choice C - Ethernet or USB (Wired)
- Close all other programs.
- Insert The AT&T High Speed Internet (formerly FastAccess®) Installation Wizard CD
- MAC Users: if you are prompted to enter a key code during installation, enter 525Z 25Z4 6266 22AS B2DC
- Install Your Filters
- Every phone jack in your house on your AT&T High Speed Internet (formerly FastAccess(R) DSL) line that has a telephone or other telephone devices attached to it must have a filter installed on it. This includes:
- Phones
- Fax Machines
- Answering Machines
- Satellite TV Receivers
- Cable Boxes
- TiVo
- Caller ID Units
- Every phone jack in your house on your AT&T High Speed Internet (formerly FastAccess(R) DSL) line that has a telephone or other telephone devices attached to it must have a filter installed on it. This includes:
- View the Filter Installation Video which will show you how to:
- Remove your telephone device from the phone jack.
- Reconnect your telephone device to the filter.
- Apply filters to wall mounted phone jacks.
- If you run out of filters, disconnect all of the unfiltered equipment until you receive additional filters and continue with the installation.
- You can continue with your installation by disconnecting the unfiltered equipment until your receive your additional filters.
- Install Your HomePortal
- Do not install the HomePortal until prompted by the Installation Wizard CD.
- To install the HomePortal you will need the following hardware components to complete this step.
- HomePortal
- Ethernet cable (yellow) or USB cable (blue)
- Power Supply (black)
- Phone cord (beige)
- Please view the HomePortal installation video provided to you on your Installation Wizard Cd.
- Connect the power supply to the HomePortal.
- Connect the provided AC power adapter from the POWER port on the Home Portal to an electrical outlet.
- The power: light on the HomePortal should be solid green.
- Connect the HomePortal to your DSL Line. See Diagram A.
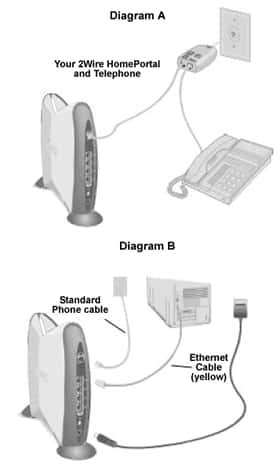
- Connect the provided telephone cable (beige) from the HomePortal's PHONE LINE port to the DSL/HPN port on the DSL filter you installed earlier.
- Connect the phone cable from your telephone device to the PHONE port on the DSL filter.
- Observe that the BROADBAND LINK light initially blinks and then stays orange. This action could take up to 3 minutes.
- Connect the HomePortal to your PC. See Diagram B.
- Connect the provided Ethernet cable (yellow) from the HomePortal's LOCAL ETHERNET port to your computer's Ethernet port. (Recommended)
- Connect the provided USB cable (blue) from the HomePortal's PC port to your computer's USB port.
- If HomePortal Lights are different, refer to the DSL HomePortal Problem section in the FastAccess Troubleshooting Guide
- To connect additional computers to your network, begin by inserting the installation wizard CD in your additional computer.
- Note: There are a variety of ways to connect additional computers to your network.
- Computers located in different rooms from the HomePortal can be connected using:
- HomePNA networking - uses a PC port adapter and your home's existing telephone wiring.
- Wireless networking - uses a wireless card (for laptops).
- Select ONE of the following choices for each additional computer:
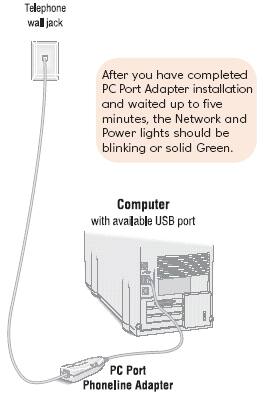
Choice A - PC Port (HomePNA adapter)
Note: The PC Port can only be used with computers running Windows XP, 2000, ME, 98 Second Edition, and Macintosh 8.6 to 9.2.
- Follow on-screen instructions given on the Installation Wizard CD.
- Connect one end of the phone cable to the PC Port.
- Connect the other end of the telephone cable to the DSL/HPN port on the DSL Filter you installed earlier.
- Insert the PC Port (USB HomePNA) Adapter into any open USB port on your computer.
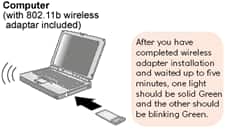
Choice B - Wireless PC Card (PCMCIA Card)
- Note: The Wireless PC Card can be used with computers running Windows XP, 2000, ME, 98 Second Edition and 98.
- AT&T recommends that you complete your wireless adapter installation in the same room as your HomePortal to receive the best signal strength and to have easy access to the numbers on the bottom of the HomePortal that will be required for installation
- Follow on-screen instructions given on the Installation Wizard CD.
- Insert the 2Wire Wireless PC Card into the PC card slot.
Choice C - Ethernet or USB (Wired)
- Follow on-screen instructions given on the Installation Wizard CD.
- Determine which port, Ethernet or USB, is available on the HomePortal. You will use whichever port was not used during the initial installation.
- Connect the provided Ethernet cable (yellow) from the HomePortal's LOCAL ETHERNET to your computer's Ethernet port (Recommended)
-OR- - Connect the provided USB cable (blue) from the HomePortal's PC port to your computer's USB port.
- Connect the provided Ethernet cable (yellow) from the HomePortal's LOCAL ETHERNET to your computer's Ethernet port (Recommended)
- Repeat Step 15 for each computer you wish to add to your home network
- The following features are included with your HomeNetworking Plus service. See the following articles to configure these features:
- Enable / Disable the Firewall in my 2Wire Gateway.
- How do I set up Parental Controls on multiple computers?
Last updated: December 7, 2022