How do I set up AT&T High Speed Internet to automatically connect in Internet Explorer?
Learn how to set up AT&T High Speed Internet to automatically connect in Internet Explorer.
To set up AT&T High Speed Internet to automatically connect
- Click the Start button.
- Select Settings.
- Select Control Panel.
- Click the Internet Options icon.

- When the Internet Options dialog box appears, click the Connections tab.
- Click the radio button next to Always dial my default connection.

- In the Dial-up Settings dialog box, verify the AT&T High Speed Internet (formerly FastAccess) connection is the default connection. If it is not, highlight it and click the Set Default button. The AT&T High Speed Internet connection appears differently depending on how the router is set up:
- PPPoE (Connection Manager): PPPoE-AT&T.net. Note: If PPPoE-AT&T.net is not listed, you must first connect using the Connection Agent interface to create it.
- PPPoE (Enternet 300): AutoDial. Note: If AutoDial is not listed, either it is installed but must be enabled, or it is not installed and not available with the version of Enternet 300 being used. Autodial is a part of the Dial-on-Demand feature, which is available on later versions of Enternet 300, but not enabled by default by AT&T. Enabling it on these versions requires editing .ini files prior to installation, which is not supported.

- Click OK.
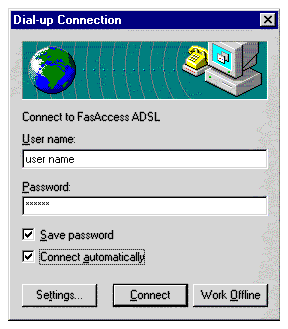
- Open Internet Explorer or Netscape and the Dial-up Connection window opens.
- Check Connect automatically.
- Enter your password in the Password field.
- Check the box next to Save password.
- Click Connect.
Last updated: December 7, 2022