Deals
iPhone deals
Samsung Galaxy deals
Gift Ideas
Business employee
55+
Military
First responders
Nurses & physicians
Teachers
Union
Credit card
&More Benefits
Explore wireless
Plans & prices
Phones & devices
Upgrade
Bring your own
Add a Line
Switch and save
Trade in your device
International options
Shop new iPhones
iPhone 16
Samsung Galaxy S25
Why AT&T Wireless
Wireless help
More resources
Explore Internet
Plans & prices
Fiber
All-Fi (Wi-Fi)
Check availability
AT&T Internet Air
Moving services
Bundles
Gaming
Home business
Internet help
Internet Speed Test
More resources
Access from AT&T
Explore DIRECTV
TV bundles
DIRECTV help
U-verse help
Explore AT&T PREPAID
Prepaid plans
Phones
Bring your own phone
Prepaid deals
Prepaid account
Activate your service
Lease-to-Own
Home Phone Services
AT&T Phone
AT&T Phone – Advanced
Landline Phone
Lifeline
Phones & accessories
Digital phone help
Landline phone help
Bundles
Internet + DIRECTV
Internet + Wireless
Internet + Phone
Home office
Smart watches & devices
Smart home
In-car Wi-Fi
All accessories
Headphones
Cases
Chargers
Screen protectors
Speakers & smart home
Internet & TV equipment
PopSockets & more
Gadgets & gaming
Accessory deals

How do I set up a Private LAN Configuration with an existing network on my Versalink modem?

Learn to set up a Private LAN Configuration with an existing network on your Versalink modem.

Set up a Private LAN Configuration

Note: The Gateway can be configured to operate on an existing network by assigning a new address to the Gateway within the same IP range as the network.

Set up a Private LAN Configuration on an existing network
  1. Change the Modem IP Address to reflect the existing network address. This address must be the first available address in the network.
    Private LAN configuration example
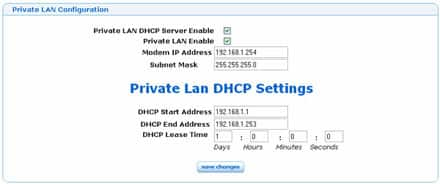
  2. Type in the DHCP Start and End Address to correlate with the Modem IP Address. The address range must be large enough to accommodate the number of computers in the network and must be greater than the value of the modem IP address.
  3. Click Save Changes.
Last updated: December 7, 2022

Browse topics