Overview | Orientation | Tasks
Add a Caller ID Routing Plan
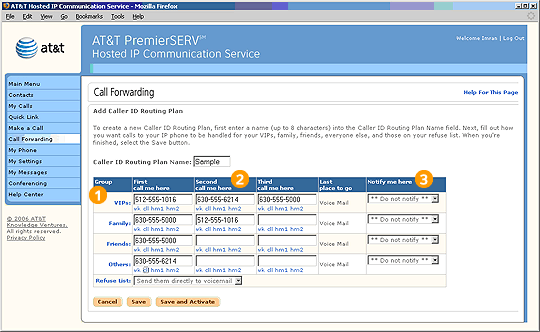
When creating a new Caller ID Routing Plan or editing information about an existing Caller ID Routing Plan, you will see this screen.
![]() Tip: To complete the table, it is easiest to focus on one group at a time, filling in the entire row for that group. For example, fill in the columns next to the VIP group before moving down to the Family group.
Tip: To complete the table, it is easiest to focus on one group at a time, filling in the entire row for that group. For example, fill in the columns next to the VIP group before moving down to the Family group.
Be sure to enter a name for the Caller ID Routing Plan that clearly describes the business situation in which you will use it.
Enter phone numbers in these fields to tell HIPCS exactly how you would like it to direct incoming calls from each of your Groups.
Select a link below a field to have HIPCS automatically fill in a phone number from your profile. For example, selecting "wk" would enter your primary work phone number.
Highlights

You can assign Contacts to a Group in two ways:
- Use the pull-down menu in the "Group" column on the main Contacts page.
- Use the "Assign to Group" pull-down menu when adding or editing Contact information.

The columns follow the order in which HIPCS will try to forward the call. If there is no answer at one number, it will try the next listed. Fields can be left blank.

The "Notify me here" option allows you to be notified of missed calls by email or pager.