
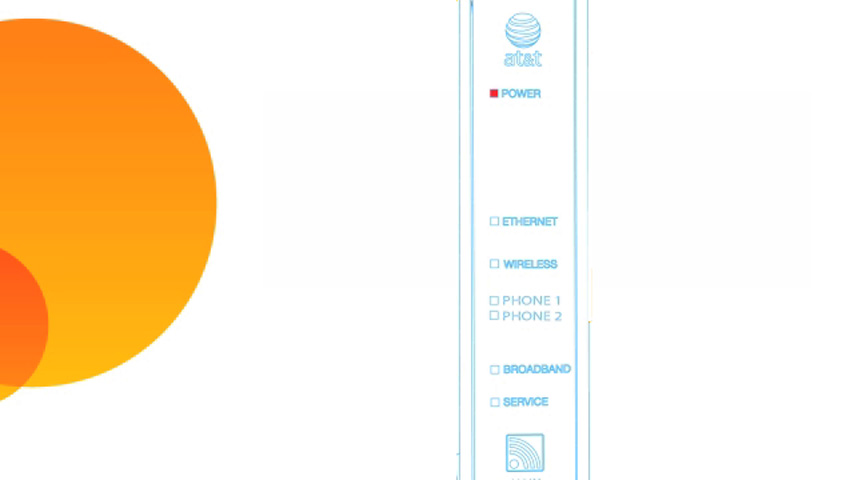
The color and state of your lights let you know the status of your 2Wire 3801 HGV-B.
2Wire 3801 Status lights
Power light
- Green (solid): Power is on.
- Red (flashing): Power-On Self-Test (POST) in progress.
- Red (solid): POST failed (not bootable) or gateway has malfunctioned.
- Off: Power is off or gateway isn’t getting power.
Local Ethernet, USB – PC, Wireless light
- Green (solid): A device is connected by Ethernet to the gateway.
- Off: No Ethernet connectivity or gateway is off.
Broadband light
- Green (solid): Broadband connection established via DSL or Ethernet.
- Green (flashing): Gateway is attempting to make a broadband connection.
- Green and red (flashing): Gateway failed to establish a broadband connection for more than three consecutive minutes.
- Red (flashing): No broadband signal (Ethernet or DSL) detected.
- Off: No physical signal detected.
Service light
- Green (solid): Internet Protocol (IP) connected.
- Red (flashing): Gateway is attempting IEEE 802.1X authentication or attempting to obtain Dynamic Host Configuration Protocol (DHCP) information.
- Red (solid): Gateway has failed to receive an IP address assignment from the network. (After two minutes of solid red, the Service light will go off.)
- Off: Gateway isn’t on, is in bridge mode, or the broadband connection isn’t present.
Intelligent Network Device (iNID) Inside Unit
Power light
- Green (solid): Power is on.
- Red (solid): Power-On-Self-Test (POST) failed or another malfunction has occurred.
Ethernet light
- Green (solid): A device is connected to an Ethernet port on the gateway.
- Green (flickering): Traffic between connected device and gateway.
Wireless light
- Green (solid): A device is connected wirelessly.
- Green (flickering): Data traffic on the network.
Line 1 and Line 2 lights
- Green (solid): The associated Voice Over IO (VoIP) line has been registered with a SIP proxy server.
- Green (flickering): A telephone is off-hook on the associated VoIP line.
NID light
- Green (solid): The link between the 2Wire 3801 HGV-B and i3812V is healthy.
Broadband light (This indicator shows the i3812V VDL status)
- Green (solid): Successful broadband connection.
- Green (flashing): The 2Wire 3801 HGV-B is attempting to establish a broadband connection.
- Green and red (flashing): Gateway failed to establish a broadband connection for more than three consecutive minutes.
- Red (solid): No DSL signal detected.
Service light
- Green (solid): The i3812V has a WAN IP address from Dynamic Host Configuration Protocol (DHCP) and the broadband connection is up.
- Green (flashing): The i3812V is attempting to be authenticated.
- Red (solid): The i38HG has failed to receive an IP address assignment from the network.
Intelligent Network Device (iNID) Power Supply Unit

Power light
- Green (solid): Power supply is running on AC power.
- Red (flashing): Power is provided by the backup battery or the outside unit is not yet communicating with the iNID power supply.
- Off: Power supply is not receiving power from either AC or the battery.
Battery light
- Green (solid): Battery is installed and functioning properly.
- Red (flashing): Battery needs to be replaced.
- Off: No battery installed.
Button functions for iNID Power Supply Unit
- Reset is located on the upper left panel, surrounded by a red circle. When pressed for up to 9 seconds, the Reset button reboots the outside unit. If the button is pressed for 10 or more seconds, it resets the outside unit to the factory settings. Don’t press the Reset button unless you’re instructed to do so. Doing so may reset the outside unit to the factory default settings, and you’ll lose your personal settings.
- Silence Alarm is located between the power and battery indicators. If AC power is interrupted for any reason, a continuous tone lets you know that the power supply is running on the backup battery. Pressing the Silence Alarm button within 15 seconds turns off the alert tone. When the battery needs to be replaced, a chirp sounds intermittently unless you press the button, which will silence the alert for 12 hours. The chirp resumes after 12 hours if the battery isn’t replaced.
Intelligent Network Device (iNID) Outside Unit
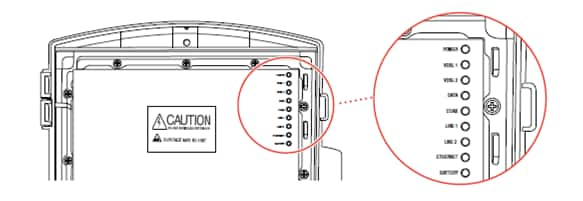
Power light
Turns red when power is first turned on. Then it changes to green within two minutes.
- Green (solid): Power is on and initialization has been completed successfully.
- Green (flashing): The iNID is booting.
- Red (solid): A Power-On-Self-Test (POST) failure (unbootable) or another malfunction (for example, alarm) has occurred during self-initialization.
VDSL 1 and VDSL 2
After the power has been on for 60 seconds, these lights will flash for one to two minutes. The broadband light on the 2Wire 3801 HGV-B mirrors one or both of the VDSL lights, whichever is in the best state.
- Green (solid): The broadband connection is trained.
- Green (flashing): The broadband connection is being attempted (DSL is attempting to synchronize).
- Green (flashing) and red (solid): The broadband connection failed to establish for more than three consecutive minutes. This pattern continues until the broadband connection is successfully established.
- Red (flashing): No DSL signal on the line.
Data
- Green (solid): A device is connected (such as a 2WIRE 3801 HGV-B).
- Green (flickering): There is inbound activity associated with the data port (that is, the green Line 1 connection) - the flickering of the light is synchronized to the actual data traffic.
- Red (solid): A device failed to be authenticated or successfully connected.
Coax
- Green (solid): A device is connected (such as a Set Top Box).
- Green (flickering): There is inbound activity associated with the COAX port (the flickering of the light is synchronized to the actual data traffic).
- Red (Solid): A device failed to be authenticated or successfully connected.
Line 1 and Line 2
These two indicators mirror Line 1 and Line 2 indicators on the i38HG.
- Green (solid): The associated VoIP line has been registered with the network and ready for use.
- Green (flashing): A telephone is in use on the associated VoIP line.
Ethernet
- Green (solid): A device (such as a computer) is connected to the Ethernet port.
- Green (flickering): Data traffic from devices connected to the Ethernet port (the flickering of the light is synchronized to the actual data traffic).
Battery light
- Green (solid): The AC power is connected and healthy.
- Red (flashing): The backup battery is used for power.