")
In this tutorial, you will learn how to:
• Set up Schedules
• Enable/disable a Schedule
• Add, edit and delete alarms from the AT&T amiGO™ app
• View step count
• Set a step goal
• Set a step goal
• Change the watch face
• Add step counter to the watch face
• Access parent controls
• Access parent controls
Set up Schedules
1. From your connected smart phone, navigate to and select the  AT&T amiGO™ app.
AT&T amiGO™ app.Note: School mode can only be setup and managed from the Guardian account in the companion app. When School Mode is enabled, calls and text messages are restricted during school hours. Parents and guardians are still able to contact the AT&T amiGO Jr. Watch™ as normal.
2. Select the  Menu icon then select Parent Controls. Select the desired Account icon, then select Schedules.

3. Select Add Schedule. Edit the Schedule settings as desired, then select Save.
Note: When a schedule is enabled, the schedule name will appear in the Status area on the watch face.

Enable/disable a Schedule
To enable or disable School Mode, from the School Mode screen in the AT&T amiGO™ app, select the switch next to the desired School Mode restriction to turn on or off.
AT&T amiGO™ app, select the switch next to the desired School Mode restriction to turn on or off. 
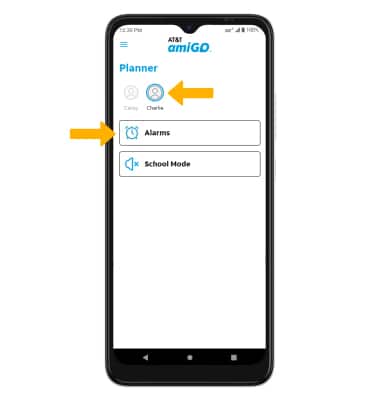
Add, edit and delete alarms from the AT&T amiGO™ app
1. From your connected smart phone, navigate to and select the AT&T amiGO™ app.
AT&T amiGO™ app.2. Select the Menu icon then select Planner.

3. Select the desired Account icon, then select Alarms.
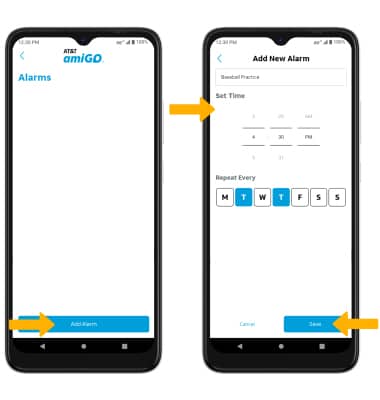
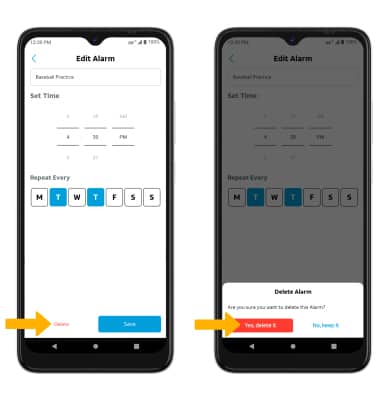
4. Select Add Alarm. Enter the desired alarm settings, then select Save.
Note: The alarm will automatically be added to the watch. Alarms added through the AT&T amiGO™ app can only be edited from the AT&T amiGO™ app.
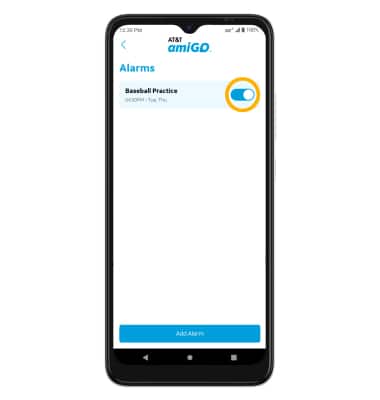
5. To enable or disable an alarm added from your connected smartphone, from the Alarms screen in the AT&T amiGO™ app, select the switch next to the desired alarm to turn on or off.
6. To edit an alarm, select the desired alarm. Edit the alarm settings as desired then select Save.
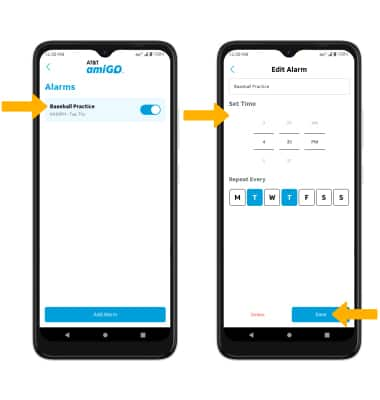
7. To delete an alarm. from the desired alarm, select Delete. Select Yes, delete it to confirm.
View step count
1. From your connected smart phone, navigate to and select the AT&T amiGO™ app.
AT&T amiGO™ app.2. Select the Menu icon, then select Fitness.

3. Select the desired device. Daily, Weekly and Monthly step counts will be displayed. To view step trends, select Step count then select the desired option.

Set a step goal
From the Fitness activity screen, select the Edit icon next to Step goal. Enter the desired step goal then select Save.

Change the watch face
1. From the Clock screen, swipe left three times then select the  Settings app.
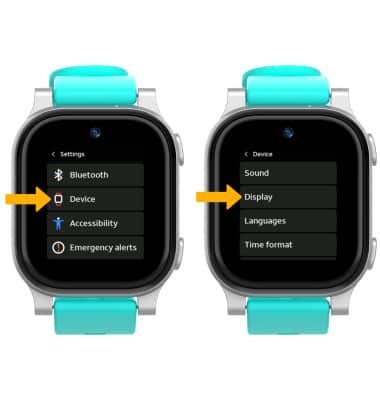
2. Scroll to and select Device, then select Display.
2. Scroll to and select Device, then select Display.
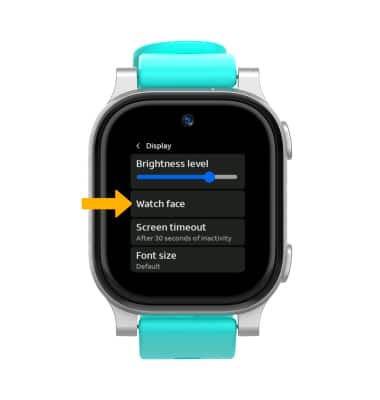
3. Select Watch face.
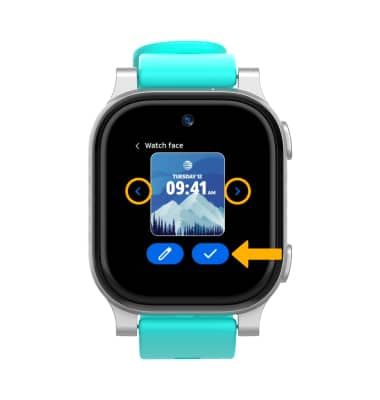
4. Select the left or right arrow to scroll to the desired watch face. When finished, select the Checkmark icon.
Note: To set the watch face to a custom photo, select the right arrow until you see the add icon. Select the add icon to add a custom wallpaper. Navigate to and select the desired picture, then select the checkmark icon.
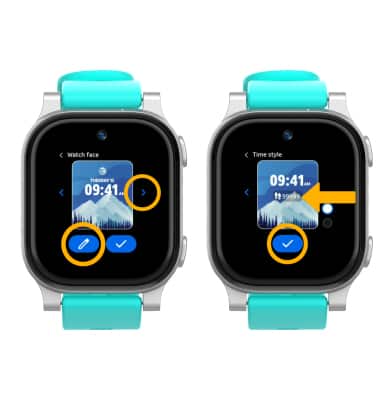
Add step counter to the watch face
From the Watch face settings screen, select the Edit icon. Select the right arrow to scroll to the time style with the step counter. When finished, select the Checkmark icon.
Note: You will be prompted to select the Checkmark icon again to save your watch face display settings.
Access parent controls
1. From your connected smart phone, navigate to and select the AT&T amiGO™ app.
2. Select the ![]() Menu icon, then select Parent controls. Select Device Settings.
Menu icon, then select Parent controls. Select Device Settings.

3. Select the Enable camera access switch to enable or disable camera access. Select the Enable game access switch to enable or disable game access.